How to Add an Image Carousel in MaxCommerce
How to Add an Image Carousel in MaxCommerce
Overview
This guide covers how to set up a horizontally scrolling brand logo carousel using a Site Text Panel in MaxCommerce. The carousel shown in this example displays approximately 5 logos at a time and rotates through all uploaded logos automatically. The same HTML can be reused for any client — you only need to update the image paths.
Before You Start
Make sure the following is in place before setting up the carousel:
- All logo images uploaded to Assets. Go to Assets in the top navigation and upload all brand logo images. Note the file path for each image (e.g.
/data/media/images/logos/brand-name.png). - You know which page and row on the homepage you want the carousel to appear in.
Part 1: Create the Site Text Panel
The carousel HTML lives in a Site Text Panel. You create this once, then attach it to the page row.
Step 1: Go to Pages > Set-up Site Text
- In the MaxCommerce admin, click Pages in the top navigation.
- Click Set-up Site Text (or Scheduled Panels depending on your view).
- Click Add New Panel and give it a clear name, e.g.
Customer Rotator.
Step2: Add the Carousel HTML
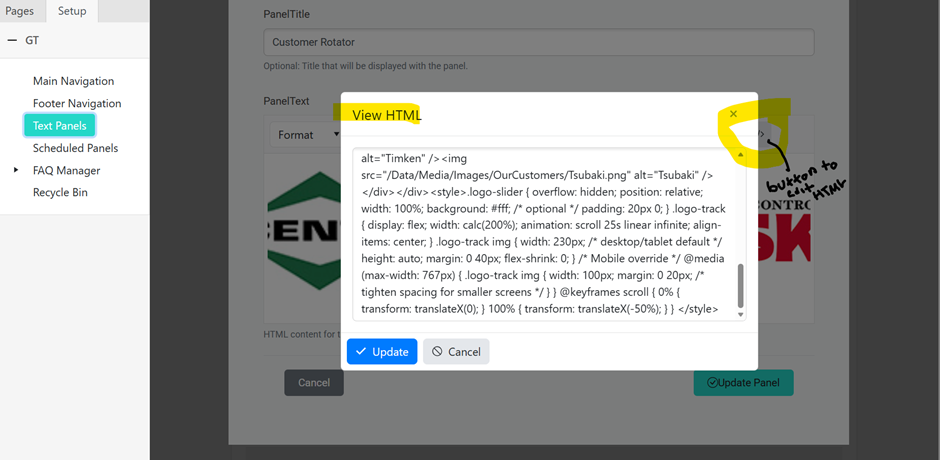
In the panel's HTML editor, paste the carousel code below. This is the same base HTML used for all clients — update only the image src paths to match your uploaded logos.


Note: To add logos, add more <img> tags following the same pattern. Duplicate the entire set of images a second time below the first — this creates the seamless infinite loop effect. Without the duplicate set, the carousel will snap back visibly.
Tip: To reuse this carousel for another client, copy the HTML from this panel and update the image src paths to point to that client's logo files. Everything else stays the same.
Step 3: Save the Panel
- Click Update to save the panel.
- The panel is now available to be placed on any page.
Part 2: Add the Panel to the Page
Now attach the Site Text Panel to the correct row on the homepage (or whichever page needs the carousel).
Step 4: Open the Page and Edit the Row
- Go to Pages > Homepage (or the relevant page).
- Find the row where you want the carousel to appear and click it to open the Content Editor.
Step 5: Select the Panel via the Controls Tab
- In the Content Editor, click the Controls tab.
- Select Panel as the content type.
- In the dropdown that appears, select the panel you just created — e.g.
Customer Rotator. - Click Edit Content to confirm, then save the row.
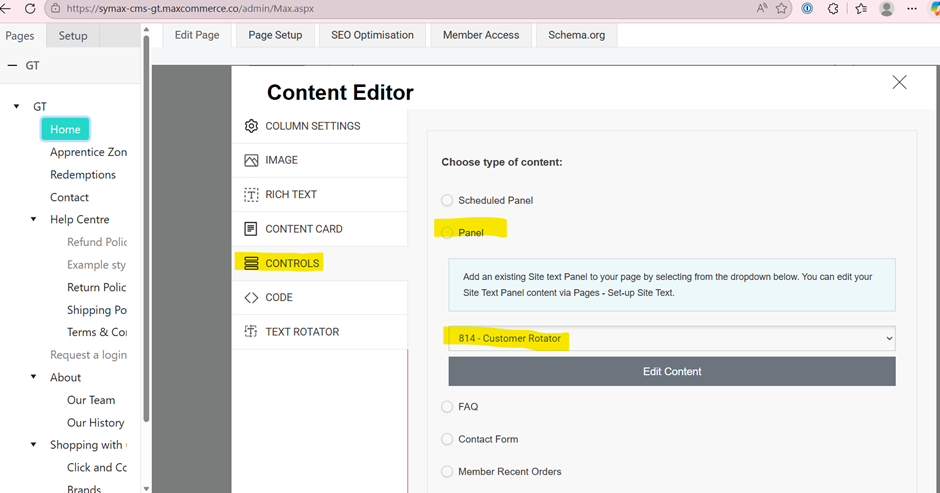
Note: The panel dropdown shows all existing Site Text Panels. If your new panel does not appear, go back to Pages > Set-up Site Text and confirm it was saved correctly.
Part 3: Publish and Test
- Save any open changes in the Content Editor.
- Publish or preview the page to confirm the carousel appears and logos are rotating correctly.
- Check on both desktop and mobile — the CSS includes a media query that reduces logo size on screens under 768px wide.
Tip: If logos appear too large or too small, adjust the width value in the <img> style attribute (default: 160px desktop, 100px mobile). If the scroll speed feels too fast or slow, change the 20s value in the animation property.
Summary
Step | Where |
1. Upload logos | Assets (top nav) > upload all logo images |
2. Create carousel panel | Pages > Set-up Site Text > Add New Panel > paste HTML |
3. Attach to page row | Pages > Homepage > edit row > Content Editor > Controls tab > Panel > select panel |
4. Publish and test | Preview page on desktop and mobile |
5. Reuse for other clients | Copy HTML from panel, update image src paths only |